LET"s Talk: info@greenaryleaf.com
As an indoor plant lover, I know firsthand how important it is to keep our green companions healthy and thriving. Over time, even the most well-cared-for plants outgrow their pots, and it becomes necessary to repot them. But repotting can be tricky—especially when you’re worried about causing damage to your plant.
If you’re wondering how to transplant plants without harming them, you’re in the right place. Today I’ll walk you through the best practices for repotting your indoor plants so they can continue to grow strong and healthy.

Why Do You Need to Repot Indoor Plants?
Before diving into the steps, let’s quickly cover why repotting is essential for your indoor plants’ well-being. Repotting helps in the following ways:
- Provides More Space: As plants grow, their roots need more space to spread out. If the roots are crammed into a small pot, your plant’s growth will slow down.
- Improves Drainage: Over time, soil can become compacted, leading to poor drainage. Fresh soil and a larger pot allow for better airflow and root development.
- Nutrient Boost: Plants use up nutrients in the soil over time. Repotting with fresh, nutrient-rich soil gives them a healthy boost.
- Prevents Root Rot: If your plant has been in the same pot for too long, the roots may start to suffocate and rot. Repotting ensures proper root health.
How to Repot Indoor Plants: A Step-by-Step Process
Repotting might seem intimidating, but trust me, with the right approach, it’s quite simple. Here’s a step-by-step guide to repotting your indoor plants without causing harm.
Choose the Right Time to Repot
Timing is everything when it comes to repotting. Generally, the best time to repot indoor plants is during their growing season (spring or early summer). This is when they are actively growing, and the stress of repotting won’t hinder their progress.
However, avoid repotting during winter when most plants are in their dormant stage. Repotting during dormancy can shock the plant and make it harder for the roots to adapt.
Pick the Right Pot
Size: For small plants, the pot should be about 1-2 inches wider in grith than the plant’s current root ball. For larger plants: Aim for a pot that’s 2-4 inches larger in circumference than the current root ball.
Depth: The depth of the pot is just as important as the width. Make sure the pot is deep enough to accommodate the plant’s root system, especially for plants that have deep roots (e.g., trees or long-stemmed plants).
Drainage: Preventing root rot. Choose a pot that has a minimum of one drainage hole. It allows pass the excess water and prevents the roots from sitting in stagnant water. If the pot isn’t have drainage holes, you can drill holes yourself (if the material allows). Place the plant in a plastic liner that fits inside the decorative pot (if the decorative pot doesn’t have holes).
Material: Terracotta pots are great for plants that prefer drier conditions, while plastic pots retain moisture better for plants that need consistent hydration.
Prepare the New Pot and Soil
Before you begin, make sure the new pot is clean and free from any dirt or debris. I like to rinse mine with warm water to ensure it’s spotless.
For soil, choose one that is specific to the type of plant you’re repotting. For example, cacti and succulents thrive in a well-draining cactus mix, while tropical plants like a rich, well-aerated potting mix.
If you need more clarification, general-purpose indoor plant soil works for most types of houseplants.
Remove the Plant from Its Current Pot
Here is where things can get tricky, but don’t worry—I’ll guide you through it!
- Hold the plant gently by its base and tilt the pot sideways. If the plant doesn’t come out easily, tap the pot’s sides or use a rough tool to loosen the soil slowly.
- Once the plant is free, take a moment to inspect the roots. If they’re tightly bound in a circle (root-bound), carefully trim away some of the excess growth with clean scissors. You want the roots to have room to spread out in the new pot.
Loosen the Roots and Inspect for Problems
Before placing the plant in its new home, gently loosen the roots. Be careful not to break them, but try to encourage them to spread out, especially if they’ve been circling the inside of the old pot.
As you’re doing this, look out for any signs of damage or disease. Yellowing, mushy, or blackened roots may indicate rot, so you’ll want to trim these away with clean scissors.
Place the Plant in the New Pot
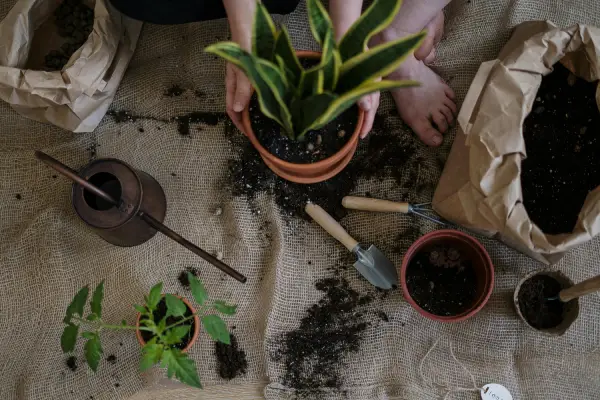
Now, it’s time to position your plant in the new one. Place a layer of soil at the base to create a stable base. Then, place your plant in the center of the pot, making sure it’s level and upright.
Add extra soil around the roots, gently pressing it down as you go to eliminate air pockets. The plant should sit at the same depth it was in its old pot. It shouldn’t be put too deep or too shallow, as this can hamper its overall growth.
Water the Plant Thoroughly
After repotting, it’s essential to water the plant well. Watering helps settle the soil and gives the roots a chance to adjust to their new environment. However, be careful not to overwater. Make sure the excess water drains out through the pot’s holes.
Provide Proper Post-Repotting Care
After repotting, your plant will need extra care to help it adjust to its new pot. Follow these tips:
- Keep it in a stable environment: Avoid moving your plant to a new location immediately after repotting. Keep it in a place where it gets the right amount of light and temperature.
- Give it time to acclimate: It’s normal for plants to go through a brief period of shock after repotting. Be patient and continue to care for it as usual, but avoid fertilizing for a few weeks to allow the roots to settle.
- Check for signs of stress: Some yellowing leaves or wilting can happen, but if these symptoms persist for too long, it may be an indication that the plant didn’t handle the transplant well.
Some Mistakes to Watch Out for When Potting Indoor Plants
Repotting your plant might seem like an easy task, but there are a few common pitfalls that can cause more harm than good. Here’s what to keep in mind:
Repotting Too Soon
Only move your plant to a new pot when it actually needs more space. Doing it too often can stress your plant out and slow down its growth.
Picking the Wrong Pot Size
Avoid going overboard with a pot that’s too large. A pot that’s much bigger than the current one can trap excess moisture and lead to root rot. Aim for just one or two sizes up.
Neglecting Drainage
Always check that your new pot has proper drainage. Without it, excess water can accumulate, leading to root rot and potentially suffocating your plant.
Overwatering After Repotting
It’s tempting to water your plant right after repotting, but overdoing it can stress the roots. Only water until the soil feels completely dry, and avoid overwatering to prevent stressing the roots.
Final Word
Repotting your indoor plants doesn’t have to be hard. Just take it slow and follow the simple steps we outline here. Before you start, check what your plant actually needs, and you’ll be able to do it the right way. Remember, repotting is key to keeping your plants healthy and growing well, so give them the space they need to thrive.
By choosing the right pot, carefully preparing the plant, and offering proper care post-repotting, you’ll be setting your plants up for success for many seasons to come.
Happy repotting, and may your indoor garden thrive!


